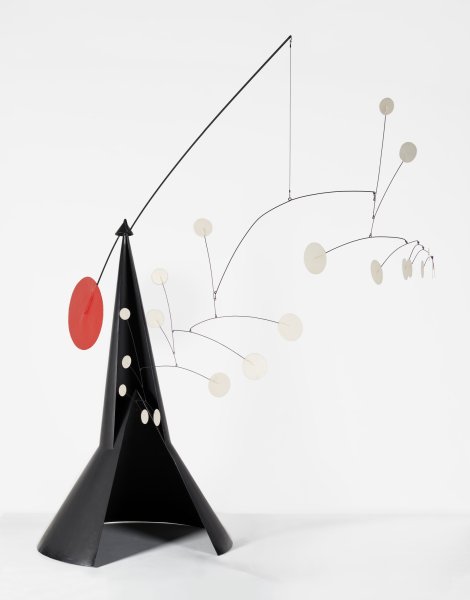
Conceptual Basis
With a degree in mechanical engineering and a passion for the arts, Alexander Calder experimented with Kinetic art through the creation of two different types of sculpture: the mobile and the stabile. Composed of delicately balanced components that respond to air currents, Calder’s mobiles are graceful and poised. In contrast, stabiles are non-moving sculptures. The Cone, 1960, combines elements of mobile and stabile sculptures. This lesson is inspired by the mobile art of Alexander Calder and the theory of kinetic energy, with a focus on the principles of balance and movement.
Alexander Calder
(American, 1898–1976)
The Cone, 1960
Painted metal
100 x 110 x 65 inches (254 x 279.4 x 165.1 cm)
Collection Albright-Knox Art Gallery, Buffalo, New York
Gift of Seymour H. Knox, Jr., 1961
K1961:24
- Become familiar with the artist Alexander Calder and his mobiles.
- Discover Kinetic art, including mobiles and stabiles.
- Increase awareness of recycling for the purposes of art.
- Support the understanding of basic art elements and principles.
- Create a hanging mobile with a focus on shapes and balance.
- Scissors
- Pencils
- Rulers
- Hole puncher
- Thin string
- Construction paper
- Medium-thickness wire (older student project)
- Metal jewelry jump rings (older student project)
- Small pliers (older student project)
- Sticks (younger grade project)
About the Artist
Alexander Calder was born into a family of artists in 1898. Calder was surrounded with art growing up, as his father and grandfather were sculptors and his mother was a portrait painter. Interested in art from a very young age, Calder created his first sculpture when he was four years old. Originally from Pennsylvania, Calder began his career with a degree in mechanical engineering. He then worked as an illustrator while pursing art at night as a student at the Art Students League of New York.
In 1926, Calder went to Paris to experience the center of the modern art world. During his time in Paris, Calder met artists that helped inspire and shape his career. After meeting Dutch painter Piet Mondrian (1872–1944), Calder became influenced by abstract work, the use of primary colors, and geometric shapes. He began creating sculptures composed of colorful shapes that moved with a motor. These sculptures evolved into mobiles and stabiles. Calder’s mobiles capture the changing relationships among various elements and, in essence, are always-changing compositions. The artist created delicate mobiles that hung suspended, with different shapes often dangling and balancing from wires. He also created non-moving stationary sculptures called stabiles during this time.
In addition to sculpting, Calder developed an interest in jewelry-making, which began with the making of his own wedding rings. Calder is also known for creating toys, including a miniature circus composed of wire, string, rubber, and cloth. Entitled Cirque Calder, 1926–31, the miniature circus captures a childhood interest of Calder’s.
About the Art
The Cone, 1960, embodies a combination of mobile and stabile sculptures. The stabile consists of a wide, hollow black cone. The cone becomes narrower towards the top, with a very small cone sitting on the apex of the sculpture. The small cone supports a steel rod that balances a large red disk on one side and an array of wires and small white discs on the other. These smaller wires and shapes cascade and connect with one another, allowing for a balanced distribution of weight.
The black, coned stabile serves as the base of the sculpture, not moving, but anchoring the whole piece. Attached to the black cone, the mobile—complete with dangling wires and shapes—has the ability to move or pivot with air currents traveling around the sculpture. Through size, weight, and color, the smaller shapes are evenly balanced against the large red disk.
Kinetic art: art composed of balanced or suspended components that move in response to air currents or motor power
mobile sculpture: moving sculpture
stabile sculpture: non-moving sculpture
balance: principle of art—feeling of equal distribution of weight in an artwork
movement: principle of art—the appearance of motion in an artwork
The creation of interdisciplinary ties between art and science is achievable in this lesson. All moving things have kinetic energy, or the energy possessed by an object due to its motion or movement. Kinetic energy is captured in a mobile. As air currents blow around the mobile, the different elements of the work will move. It is for this reason that mobiles are often referred to as a type of Kinetic art.
For a hands-on activity based on kinetics, you can demonstrate different ways wind can create kinetic energy in objects or how air can create movement in different objects. Having students interact with materials such as paper fans, sailboats, party favors that unroll when you blow into them, kites, and flags can help them understand kinetic energy.
Begin the activity by having students cut shapes out of construction paper. Encourage students to cut different sizes for their mobile to experiment with balance. Creating more shapes than needed (six to eight) will help students experiment with balance during the artmaking section of the activity. You can tailor the lesson to include geometric or organic shapes and a variety of paper colors. Once students have cut their shapes, distribute sticks (younger students) or wire (older students) for their mobiles.
For younger students, the sticks will hang horizontally on the mobile. The largest stick will serve as the base of the mobile. Tie one piece of string in the middle of the base stick. This will be the hanging string when the project is completed. Tie a string around the middle of each smaller stick. Attach one of the smaller sticks to one side of the large base stick, leaving about six inches of string between the two. Attach another smaller stick to the other side of the base stick. You can encourage students to adjust the length of the string between the sticks for variety in their mobiles. For added difficulty, add additional hanging sticks off of the smaller sticks for more detailed mobiles.
Once the structure of the mobiles is set, have students punch one hole toward the top of each of their shapes. Students should tie string through the holes in their paper shapes and attach the strings to the sticks. Working with a partner can be beneficial during this stage of the artmaking process as students experiment with creating balance in their mobiles. Encourage students to test different shapes and weight combinations on each stick to achieve balance. When the sticks all hang horizontally when the mobile is held up by the base stick’s string, balance has been achieved. Mobiles can be displayed hanging all around the school!
For older students, pass out three pieces of wire cut to the same length. The longer the wire, the larger the mobiles will be. Have students bend a small loop at the end of each wire using pliers. The loops should all face the same direction. These loops will serve as the horizontal hanging arms of their mobiles. Using pliers, hold one piece of the wire in the middle. Wrap the wire around the pliers to create a loop set in the center of the wire. Repeat with the other two pieces of wire. These loops will enable students to connect the mobile pieces.
To create the skeleton of the mobile, set one of the wires on a flat surface (this will be the top tier). Take another wire and attach its center loop to the right loop of the first wire using a jump ring. Then, take the third wire and attach its center loop to the right loop of the second wire using another jump ring. Tie string to the center loop on the top tier. This string will allow the mobile to hang. (See: Teacher Example)
Once the skeletons of the mobiles are created, students should attach their different hanging shapes to their skeletons. Have students punch one hole toward the top of each of their shapes. With string, attach one shape to each of the empty remaining loops on the wire skeleton. You can encourage students to adjust the length of the string between the shapes for variety in their mobiles. Encourage students to test different shapes and weight combinations on each wire to achieve balance. When the wires all hang horizontally when the mobile is held up by the base wire’s string, balance has been achieved. Students can even bend the wire to create unique shapes in their mobiles. Mobiles can be displayed hanging all around the school!
Lesson Tips
- Creating different specific shapes based on themes can help tailor this lesson to a variety of disciplines.
- If you do not have a hole puncher, have students create two identical shapes for each mobile shape addition, then glue the string between the shapes to attach that section onto the mobile.
- Adding designs on the shapes of the mobile can add detail and variety.
- Students can add pictures or adjectives about themselves to create a work that is representational and personal.
- Instead of using plain colored construction paper, try using colored sheets of transparent plastic for a “sun catcher” appearance.
- To create a stabile-mobile, older students can sculpt stabiles using clay. Their mobiles can be connected to their stabiles rather than hung.
- If you do not have jump rings, create your own using small pieces of wire.
Alexander Calder said, “To most people who look at a mobile, it’s no more than a series of flat objects that move. To a few, though, it may be poetry.” Have your students think about the shapes, colors, balance, and movement they have experienced through their sculptures. What do all of these things remind them of? Have them write poems about what the sculptures remind them of or make them think about.
- New York State Learning Standards for the Arts: 1, 2, 3
- New York State Learning Standards for Mathematics, Science, and Technology Education: 1, 3, 4
- College and Career Readiness Anchor Standards for Language: 1, 2, 3, 6
- College and Career Readiness Anchor Standards for Reading: 1
- College and Career Readiness Anchor Standards for Mathematical Practice: 1, 2, 3, 4, 5, 6